---
title: Your title
author: Author name
format: html
---1 Introduction to Quarto
Learning Objectives
- Get familiar with the workflow of using Quarto in RStudio.
- Understand the anatomy of a Quarto Markdown Document.
- Know how to work with headers and code chunks in .qmd files.
- Know how to format code chunks and text in .qmd files.
- Know how to render Quarto documents to various outputs.
1.1 Working with Quarto
Quarto is a multilingual version of RMarkdown built on Pandoc that allows us to seamlessly combine text and code to create dynamic outputs. Like RMarkdown, it uses knitr to render outputs in the form of documents, web pages, and more.

Use R Projects (.Rproj files) to organize your analysis. When you double-click a .Rproj file, RStudio will open an set the working directory to the project folder.
Do not double-click .R files! If you do so, RStudio may open to a different project directory, and it won’t know where your files live.
So open files that look like this:

1.2 Anatomy of a Quarto Markdown Document
A Quarto Markdown document (.qmd) has three main parts:
- Header
- Markdown text
- R code
1.3 Header
You control the overall document settings in the YAML header (the parts between the --- symbols at the top of the .qmd file. ). Things like the title and author can be set here.
You can also define the output type with format. The default output is an html page, which you can open in a web browser:
Add table of contents with toc, or change the theme under the format setting (More on themes at https://quarto.org/docs/output-formats/html-themes.html):
---
title: Your title
author: Author name
toc: true
format:
  html:
    theme: united
---
You can also rende to other formats, like PDF with format: pdf, which leverages LaTex to render:
---
title: Your title
author: Author name
format: pdf
---
If you don’t have LaTeX on your computer, install tinytex in R:
tinytex::install_tinytex()You can also render to Microsoft Word:
---
title: Your title
author: Author name
format: docx
---
1.4 Markdown Text
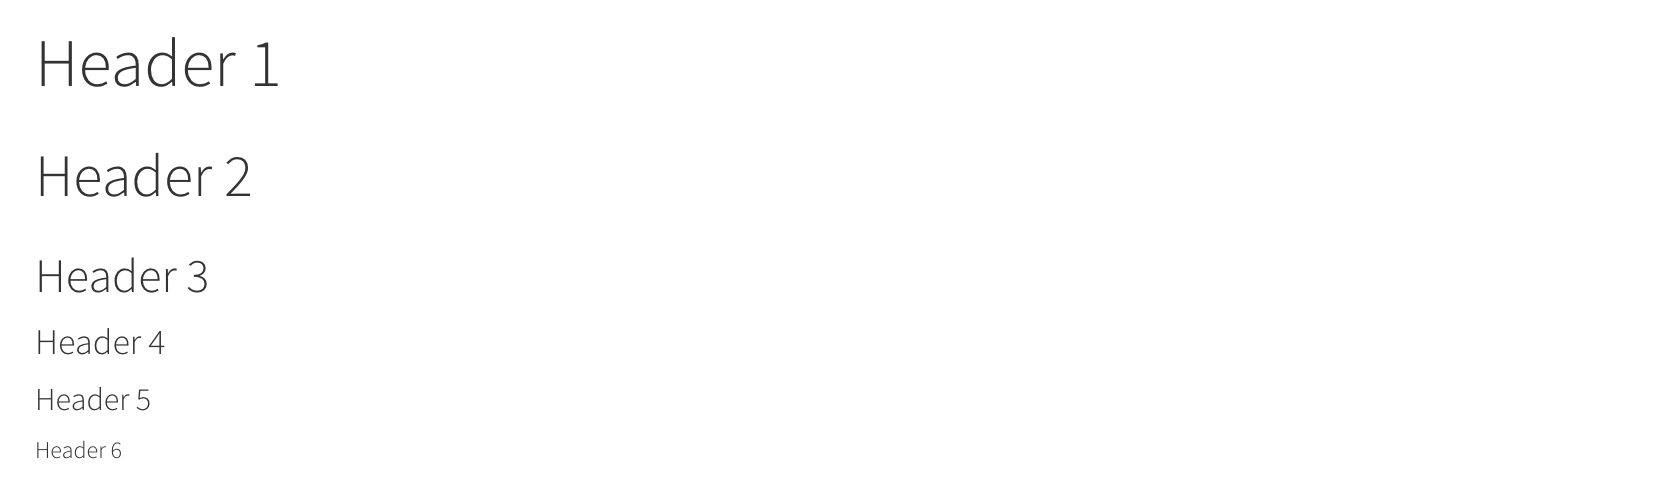
Use the # symbol to create headers.
Type this…
# HEADER 1

## HEADER 2

### HEADER 3

#### HEADER 4

##### HEADER 5

###### HEADER 6
..to get this
Type this…
normal text_italic text_*italic text***bold text*****bold italic text***~~strikethrough~~`code text`
..to get this
- normal text
- italic text
- italic text
- bold text
- bold italic text
strikethroughcode text
Use - to make a bullet list:
Type this…
- first item
- second item
- third item
..to get this
- first item
- second item
- third item
Use numbers to make a numbered list.
Type this…
1. first item
2. second item
3. third item
..to get this
- first item
- second item
- third item
Simple url link to another site:
Type this…
[Download R](http://www.r-project.org/)..to get this
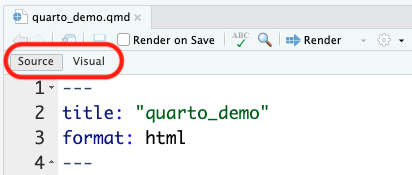
Don’t want to use Markdown? Use RStudio Visual Mode! This is a WYSIWYG editor that allows you to write like you would in Word, but then RStudio will convert it to Markdown for you.
1.5 R Code
1.5.1 Inline R code
Use backticks to insert R code into text, like this:
`r insert code here`The sum of 3 and 4 is `r 3 + 4`Produces this:
The sum of 3 and 4 is 7
1.5.2 R Code chunks
Insert R code into a chunk like this:
```{r}
insert code here
insert more code here
```
For example, the following code chunk will load the palmerpenguins package and print the first 6 rows of the penguins dataset:
```{r}
library(palmerpenguins)

head(penguins)
```
#> # A tibble: 6 × 8
#> species island bill_length_mm bill_depth_mm flipper_length_mm body_mass_g
#> <fct> <fct> <dbl> <dbl> <int> <int>
#> 1 Adelie Torgers… 39.1 18.7 181 3750
#> 2 Adelie Torgers… 39.5 17.4 186 3800
#> 3 Adelie Torgers… 40.3 18 195 3250
#> 4 Adelie Torgers… NA NA NA NA
#> 5 Adelie Torgers… 36.7 19.3 193 3450
#> 6 Adelie Torgers… 39.3 20.6 190 3650
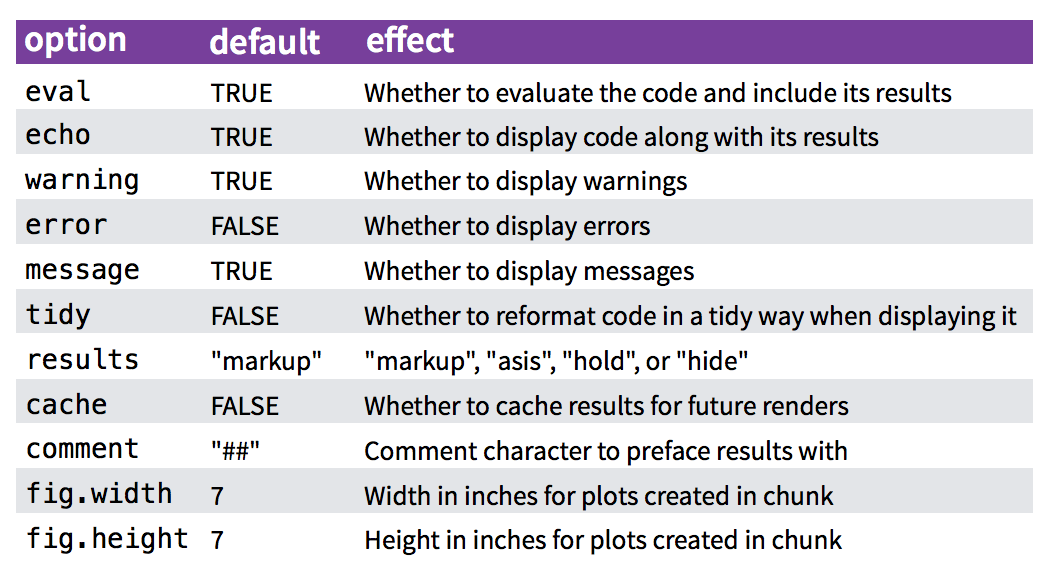
#> # ℹ 2 more variables: sex <fct>, year <int>1.5.3 Chunk Options
Use chunk options to control what code chunks output.
See all options here
By default, code chunks print code + output, like this:
```{r}
cat('hello world!')
```
#> hello world!Setting echo: false will print only the output but not the code.
Code chunk:
```{r}
#| echo: false

cat('hello world!')
```Output:
#> hello world!Setting eval: false will print only the output but will not run the code.
Code chunk:
```{r}
#| eval: false

cat('hello world!')
```Output:
cat('hello world!')Setting include: false will run the code but not print anything.
Code chunk:
```{r}
#| include: false

cat('hello world!')
```Output:
1.5.4 A Global setup Chunk 🌍
We typically use a setup chunk to set global chunk options at the top of the document, like this:
```{r}
#| label: setup
#| include: false

knitr::opts_chunk$set(
    warning = FALSE,
    message = FALSE,
    fig.path = "figs/",
    fig.width = 7.252,
    fig.height = 4,
    comment = "#>",
    fig.retina = 3
)
```
This chunk will set global chunk options for all following chunks in the document. You can still also use individual chunk options too.
This setup chunk does the following:
- Any warnings will not be printed
- Any messages will not be printed
- Figures will be saved to the
figs/folder - Figures will be 7.252 inches wide and 4 inches tall
- Any code print out will start with
#> - The
fig.retinasetting improves overall figure resolution.